 |
Great for entertaining the kids for hoursWhat you need:
|
 |
Scrunch scrap paper into a ball shape |
 |
Tie string firmly around the ball |
 |
Sticky tape string and ball together |
 |
Tie a knot 2" from the end for something to hold onto |
 |
Great for entertaining the kids for hoursWhat you need:
|
 |
Scrunch scrap paper into a ball shape |
 |
Tie string firmly around the ball |
 |
Sticky tape string and ball together |
 |
Tie a knot 2" from the end for something to hold onto |
 |
| Adhere the centre piece of cardboard with the La Carta cardstock. Thenadhere the rest of the cardstock pieces onto the matching cardboard pieces. |
 |
| The pieces should now look like this. |
 |
| Adhere the centre piece of the wheelbarrow to the back of one of the wheelbarrow shapes. |
 |
| Adhere the other wheelbarrow panel together |
 |
| Trace out the components onto the back of the cardstock. Trace an extra set of soles as inside liners of the baby shoe. |
 |
| I didn't cut out the tabs around the shoe. I just left them solid and then snipped the edge where the tabs should be so the shoe could have a complete seal around it. |
 |
| Then I glued the ends together before assembling the top part of the shoe to the bottom of the shoe. |
 |
| Once the glue is pretty dry, I trimmed the shoe liner slightly and then glued to the insole part of the shoe. |
 |
| I added a lace trim to the entire edge of the shoe to finish it off. |
 |
| Punch a 1/16 hole for the brad and then insert the brad to buckle up the shoe. |
 |
| Finished of the baby shoe with lace bows to the front of the baby shoes |
 | |
| More examples of baby shoes I have made using different papers. I hope you get to try these out! |
 |
| Die cut 2 of the birdhouse shapes from cardboard and a rectangle piece that is 6" x 1 3/4" |
 |
| Shape the rectangle to create walls and floor of the birdhouse. Glue down to the back one birdhouse shape til set. |
 |
| Glue down the other birdhouse shape. |
 |
| Punch a decorative border at the ends of the roof shapes and ink the edges with Antique Linen distress ink. |
 |
| Adhere lace between each layer edge |
 |
| Adhere the largest roof layer first and then stagger the rest of the roof shapes finishing with the smallest on the top. |
 |
| Embellish as desired with pearl flourish, flowers, bird from the Tim Holtz birdcage die and adhere a loop of lace/ribbon at the top for hanging ornaments |
 |
| This bird house was created the same way but instead of painting it, I covered the birdhouse with La Carta weave paper. |
 |
| Die cut 10 red rose leaves from the Tattered leaves dies set and 3 green rose leaves. Adhere together 5 red leaves first |
 |
| Pinch the ends to create dimension to the flower. |
 |
| Adhere the next 5 petals on top (remember to offset the petals to create a fuller effect). Pinch the ends of this layer as you did with the first layer. |
 |
| Adhere the green leaves to the back of the flower making sure you can see them from the front. |
 |
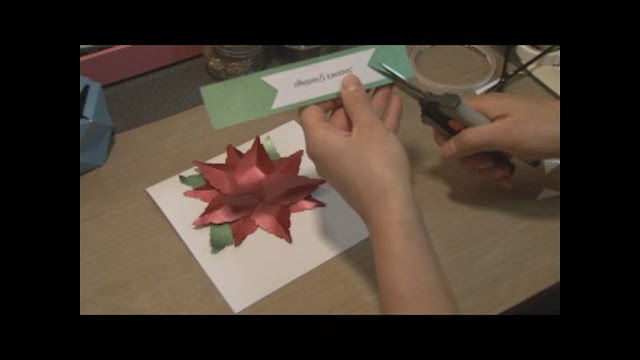
| Fold a piece of 6"x12" cardstock in half to create the base of the card. Adhere poinsettia with foam double sided tape to the front and slightly to the top to make room for the sentiment. |
 |
| Print a sentiment onto plain cardstock and snip fishtail ends to each side of the sentiment. |
 |
| Adhere the sentiment to piece green metallic paper to create a lovely border around the sentiment. Cut fishtail ends using the sentiment as a guide. |
 | |||
| I created this mini for my sister using the DCWV All Dressed Up cardstock stack and cre8tiv mini stacks. |
 |
| Die cut wings were created to make a pocket for tags. |
 |
| A very simple page with a frame for a photo and journaling. |
 |
| This opens up for photos and journaling |
 |
| Pocket full of tags. |
 |
| A double page spread with corners made from ribbon and pockets behind for tags. |
 |
| I made this gorgeous expandable folder by copying an expandable folder I have. Inside holds heaps of pockets and tags that look like files. |
 |
| I crackle accented this chipboard photo frame in black soot shape and also holds tags behind it. |
 |
| The dress form holds a tag that is tucked behind it. The tag slides out and flips open pages for photos and journaling. |
 |
| A photo frame and a tag behind it.. These are handmade flowers from ribbon. |
 |
| Another simple page with a photo frame for a large photo and journal below it. |
 |
| I love these petal envelopes as you can tell I use them all the time in my minis. Great was to display photos and journaling. |
 |
| This page was inspired by Sex In The City. My sister and I used to watch it all the time. The tags pull out for photos and journaling. |
 |